
After selecting the hardware platform in part 1, selecting the sensor and beginning to interact with it through MicroPython in part 2, now it’s time to refine the code and bring some Wifi connectivity to the mix.
Let’s consider that we are able to connect our ESP32 to the home Wifi network, our simple architecture still requires two important things:
- Our messaging protocol: A way to report sensor data from various sensor devices to a central logic unit. Think of your 15 water leak sensors across different points in your house reporting their status (under the sink, in each bathroom, under the washing machine, next to the water heater etc.)
- Our home automation brain: A way for taking actions on those measurements. this is our gateway to automation
Messaging with MQTT
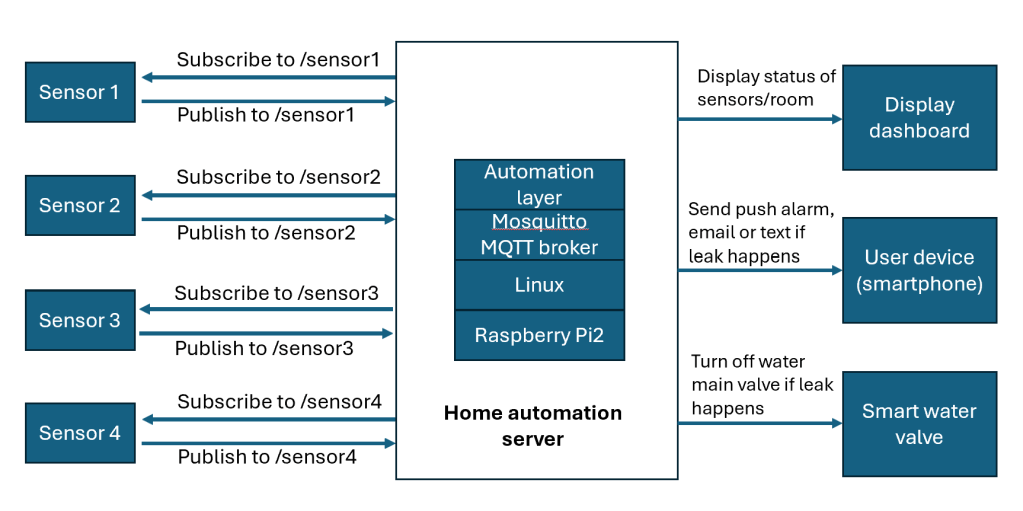
MQTT (Message Queuing Telemetry Transport) is a lightweight, open protocol designed for simple, efficient communication between devices over a network. It uses a publish/subscribe model, where devices (clients) can publish messages to topics, and others subscribe to receive updates from those topics. At the core is the MQTT broker, a server that handles all the message routing between clients, which can range from microcontrollers and sensors to smartphones and cloud applications.
In the above diagram, each sensor has its own topic (/sensor1 for example), the server will collect the messages which will be triggered by the ESP32 monitoring the sensor changes, then the home server tales the necessary actions from notifying the user (email, push message, text) when needed, or even actuating a smart valve to shutoff the water when a leak is detected. all these actions can also utilize MQTT topics and messages or additional automation layer.
Key Features of MQTT:
- Lightweight: Minimal resource requirements, well-suited for microcontrollers like the ESP32.
- Efficient: Optimized for low-bandwidth, unreliable, or high-latency networks.
- Scalable: Supports networks from a handful of devices to millions.
- Reliable: Offers multiple quality-of-service (QoS) levels for message delivery—ensuring data gets where it needs to go.
- Secure: Supports encryption (TLS) and authentication protocols.
- Flexible: Works across multiple programming languages and platforms
MQTT is well suited for our application, and to run it you can use a dedicated server like a Raspberry Pi or an old PC/laptop. In my case I had an old Raspberry Pi2B that used to host the MQTT broker and to host additional functions we will explore later.
Setting up the MQTT broker on Raspberry Pi
In my case I had an old Raspberry Pi2B that used to host the MQTT broker and to host additional functions we will explore later.
It’s easiest to configure the raspberry Pi as “headless” i.e, it will not be connected to a monitor and keyboard directly but you will connect remotely to it with SSH once it is connected to your home network via Ethernet, you will define your user and password on the pi when setting up the image to flash (I used raspberry Pi Debian Linux).
Once your Pi is up and running, you will need to identify the IP address of your raspberry pi. To figure this out the first time before you are able to SSH to your pi you can use one of these options:
- Connect to your router admin page (usually something like 192.168.1.1 when you are connected to your home LAN and check the list of devices connected you will usually be able to recognize your Raspberry Pi device from the name. This will also be a good time to assign a static IP Address to your Pi, it makes it easier to work with it later on.
- Connect a keyboard, mouse and monitor the first time to your PI and run the command : ip addr or ip a
Let’s assume your Pi is assigned the static IP “192.168.1.75”, your Pi user is “username” and your password is “password”, this is how you would SSH into your Pi from your main computer (linux or WSL from windows):
ssh username@192.168.1.75You will be prompted to enter the password and then you will be logged in to the Pi machine.
You will now need to install the Mosquitto MQTT broker on your Pi with the following command:
sudo apt install -y mosquitto mosquitto-clientsOnce the installation is complete you need to run Mosquitto in the background as a daemon:
mosquitto -dTo create and subscribe to a MQTT topic called “testTopic” you can type the following command in a new terminal window [2] (the second line is for the case you have enabled a username / password on the broker through the configuration file):
mosquitto_sub -d -t testTopic
mosquitto_sub -d -t testTopic -u user -P pass
To publish a sample message to “testTopic” open a new terminal window [3] and run this command (the second line is for password enabled broker):
mosquitto_pub -d -t testTopic -m "Hello world!"
mosquitto_pub -d -t testTopic -m "Hello world!" -u user -P pass
You should be able to see the message on terminal window [2] if everything works well.
Another useful test tool is an a MQTT client on your smartphone, I found “MyMQTT” on android and was able to use it to test the messages go through as expected.
Connecting the ESP32 to Wifi and to the MQTT broker
Back to the ESP32, we will need to simplify things by testing only the Wifi connectivity and the MQTT broker connection, we will add back the water leak detection code once this aspect is tested.
For this test we will need to have two .py files, the first one “boot.py” sets up the Wifi connection in the ESP32 :
#boot.py
#runs at ESP32 boot to connect to the Wifi (SSID and password provided #in the code below as WIFI_SSID', 'WIFI_PWD', replace with your own)

def connect():
    import network
    sta_if = network.WLAN(network.STA_IF)
    if not sta_if.isconnected():
        sta_if.active(True)
        sta_if.connect('WIFI_SSID', 'WIFI_PWD')
        while not sta_if.isconnected():
            pass # wait till connection
    print('network config:', sta_if.ifconfig())

connect()
The second file, “main.py” has the code to connect to the MQTT broker hosted on our Pi and send some messages on the topic “hello”
#main.py
#this is the main code that setups the MQTT broker connection (IP #address in code)and publish a test message on the topic ‘hello’

# the library umqtt.simple has all the Micropython implementation
from umqtt.simple import MQTTClient
from machine import Pin
from time import sleep

print("starting MQTT publishing")

### --- same as before ---
CLIENT_NAME = 'blue'
BROKER_ADDR = 'PI_IP_ADDRESS'
mqttc = MQTTClient(CLIENT_NAME, BROKER_ADDR, keepalive=60)
mqttc.connect()
### ----------------------

# setup the MQTT topic and the test message
topic = b'hello'
message = b'testing from ESP32!'

#simple loop to repeat the message 11 times
counter =0
while counter<11:
  mqttc.publish(topic, message)
  counter=counter+1
  sleep(6)

print("all done")
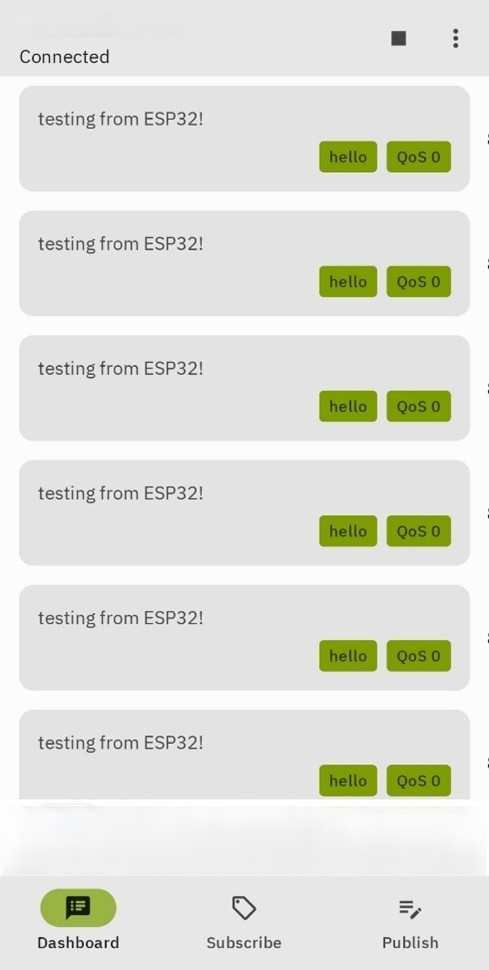
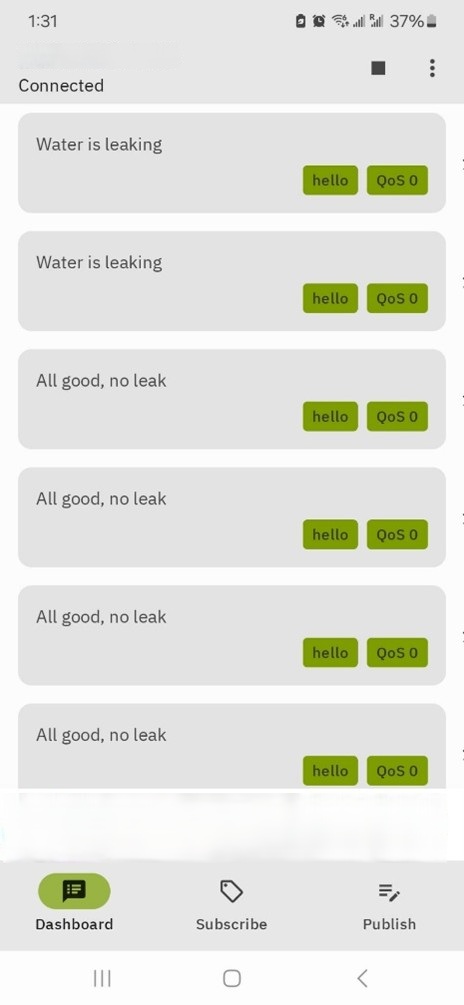
Open your MQTT client app on your smartphone, connect to the PI and subscribe to the topic “hello” or do the same from the terminal client connected to your pi as shown in the previous section.
Now run the ESP32 code above, you should start seeing the messages come through:
Full code for connected water leak sensor
Now we start to put together the code for detecting a water leak with a binary sensor and making it send a MQTT message if a leak is detected, it will also sound a buzzer for local alarm.
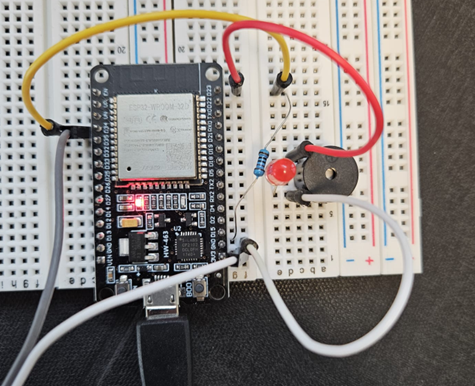
The circuit is building on top of the previously shown binary sensor by adding these components:
- Buzzer :
- (+) lead connected to GPIO 23 on ESP32
- (-) lead connected to GND
- LED (red) : connected in parallel to the buzzer
- Modification to the ADC input pin:
- It turns out the previously setup pin 13 is used by ADC2 on the ESP32 and while Wifi is connected it is not possible to use the ADC2 pins (4,2,15,13,12,14,27,26,25)
- I moved the ADC pin to be ADC1 on pin 34 to avoid this issue
- Other alternative could be to disconnect and reconnect Wifi when the ADC2 is not reading, which is probably an improvement to do to reduce power consumption.
The boot.py file will remain as show in the previous section
The main.py will be updated to include the sensor code:
from umqtt.simple import MQTTClient
from machine import Pin, ADC
import time
SIGNAL_PIN = 34 # The ESP32 pin GPIO34 (ADC1_CH6) connected to the S pin of water sensor
BUZZER_PIN = 23
CLIENT_NAME = 'blue' #name of our ESP32 device
BROKER_ADDR = 'PI_IP_ADDRESS' # MQTT broker IP address
#setup buzzer pin
buzzer=Pin(BUZZER_PIN, Pin.OUT)
buzzer.value(0) #initially no sound
#connect to MQTT broker
mqttc = MQTTClient(CLIENT_NAME, BROKER_ADDR, keepalive=60)
mqttc.connect()
topic=b'hello'
LEAK =b'Water is leaking'
NOLEAK=b'All good, no leak'
# Setup ADC for reading the water sensor
signal = ADC(Pin(SIGNAL_PIN))
# Set the ADC width (resolution) to 12 bits
signal.width(ADC.WIDTH_12BIT)
# Set the attenuation to 11 dB, allowing input range up to ~3.3V
signal.atten(ADC.ATTN_11DB)
while True:
#power.value(1) # Turn on power to the sensor
time.sleep_ms(10) # Short delay to allow sensor to stabilize
value = signal.read() # Read the analog value from sensor
#power.value(0) # Turn off power to the sensor
if value > 500: # Check if the water level exceeds the threshold
print(LEAK)
mqttc.publish(topic,LEAK)
buzzer.value(1)
else:
print(NOLEAK)
mqttc.publish(topic,NOLEAK)
buzzer.value(0)
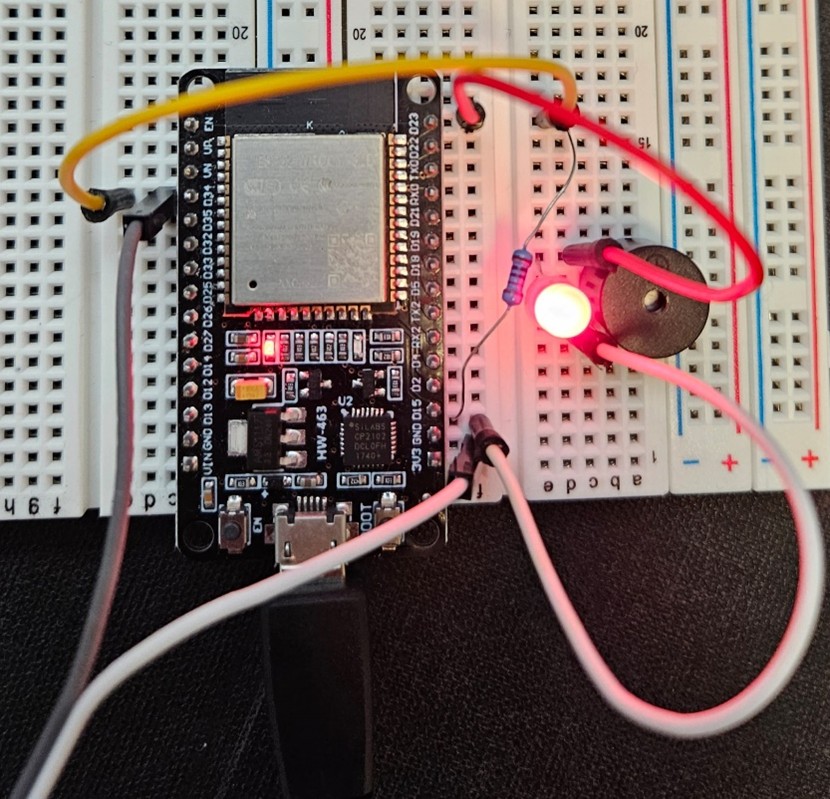
time.sleep(5) # Delay for 5 second before the next readingBy testing and monitoring the ‘hello’ MQTT topic with the android My MQTT app we can see the messages are being published correctly and the buzzer and led on the breadboard sound and light up when the sensor is wet.
We started getting close to a connected sensor reality, we will continue exploring how we can further integrate this with additional capabilities for monitoring and actions (automation).

Leave a comment